Kia Rio: SRSCM / Side Impact Sensor (SIS)
Description and operation
| Description |
| • |
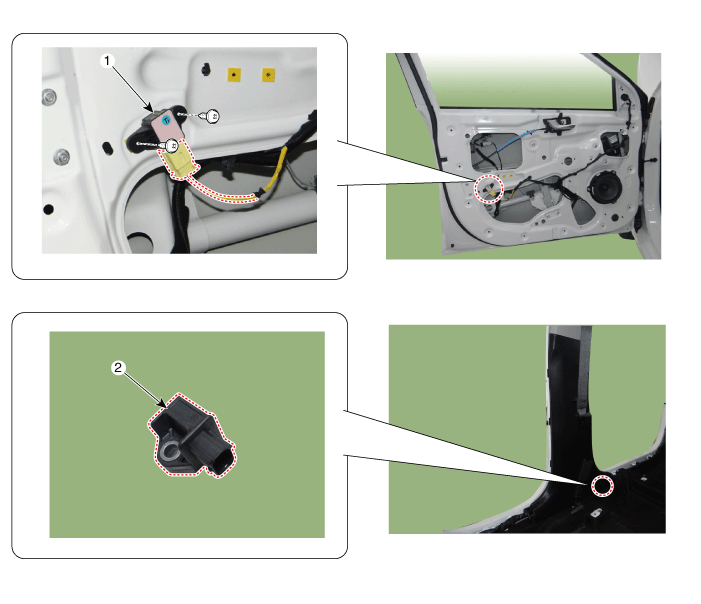
Side Impact Sensor (SIS) system consists of two Pressure Side Impact Sensor (P-SIS) which are installed at each center of the front door module (LH and RH). |
| • |
Pressure Side Impact Sensor is also called P-SIS because it detects pressure due to collision at its mounting location. |
| • |
Side Impact Sensor is also called A-SIS because it detects acceleration. |
| • |
SRSCM decides deployment of the airbag and the time of deployment through the collision signal of the SIS when the collision occurred. |
Components and components location
| Components |

| 1. Pressure side impact sensor
(P-SIS) |
2. Front Gravity Side Impact
Sensor (G-SIS) |
Repair procedures
| Removal |
Pressure side impact sensor (P-SIS)
| 1. |
Disconnect the battery negative terminal, and wait for at least thirty seconds before beginning work. |
| 2. |
Remove the front door trim. (Refer to Body - "Front Door Trim") |
| 3. |
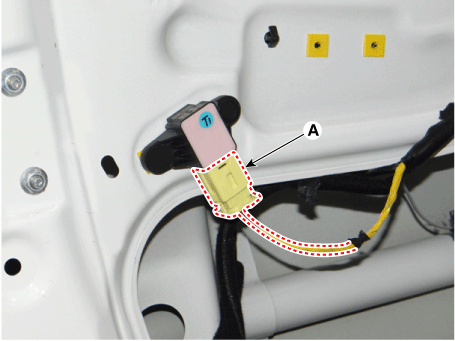
Remove the pressure side impact sensor (A).
|
| 4. |
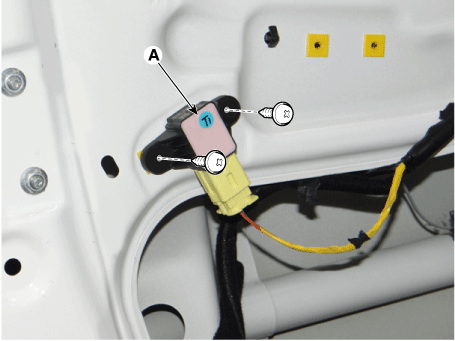
Loosen the side pressure sensor mounting screw, and remove the sensor (A).
|
Front Gravity side impact sensor (G-SIS)
| 1. |
Disconnect the battery negative terminal, and wait for at least thirty seconds before beginning work. |
| 2. |
Remove the center pillar trim. (Refer to Body - "Center Pillar Trim") |
| 3. |
After disconnecting the side impact sensor connector (A) and loosening the bolt(B), remove the sensor.
|
| Installation |
Pressure side impact sensor (P-SIS)
| 1. |
Disconnect the battery negative terminal, and wait for at least thirty seconds before beginning work. |
| 2. |
Install a pressure side impact sensor screws.
|
| 3. |
Connect the pressure side impact sensor.
|
| 4. |
Install the front door trim. (Refer to Body - "Front Door Trim") |
| 5. |
Reconnect the battery negative terminal. |
| 6. |
After installing the pressure side impact sensor, confirm proper system operation: • Turn the ignition switch ON; the SRS indicator light should be turned on for about six seconds and then go off.
|
Front Gravity side impact sensor (G-SIS)
| 1. |
Disconnect the battery negative terminal, and wait for at least thirty seconds before beginning work. |
| 2. |
Connect the side impact sensor connector (A) and then tighten the bolt (B).
|
| 3. |
Install the front door trim. (Refer to Body - "Front Door Trim") |
| 4. |
Reconnect the battery negative terminal. |
| 5. |
After installing the side impact sensor, confirm proper system operation: • Turn the ignition switch ON; the SRS indicator light should be turned on for about six seconds and then go off. |
 Front Impact Sensor (FIS)
Description and operation
Description
•
The front impact sensor (FIS) is installed in the Front End Module (FEM).
They are remote sensors that detect acceleration du ...
 Seat Belt Buckle Switch (BS)
Description and operation
Description
The SRSCM shall monitor the status of the driver and front passenger seat belt
buckle. The SRSCM provides one pin each for the driver and front pa ...
Other information:
Kia Rio 2017-2025 YB Service Manual: Speaker
Repair procedures Inspection Troubleshooting of the speakers When handling the speakers : • Do not cause shock to the speakers by dropping or throwing them. ...
Kia Rio 2017-2025 YB Owners Manual: Care of seat belts
Seat belt systems should never be disassembled or modified. In addition, care should be taken to assure that seat belts and belt hardware are not damaged by seat hinges, doors or other abuse. Periodic inspection All seat belts should be inspected periodically for wear or damage of any kind. ...


