Kia Rio: Clutch System / Regulator
Components and components location
| Componets |
[Gasoline 1.0 T-GDI, Diesel 1.4]

| 1.. Clutch pedal assembly 2. Ignition lock and clutch switch 3. Master cylinder |
4. Clutch regulator 5. Clutch tube |
Repair procedures
| Removal |
[Gasoline 1.0 T-GDI, Diesel 1.4]
| 1. |
Turn ignition switch OFF and disconnect the negative (-) battery cable |
| 2. |
Remove the air cleaner. D 1.4 U2 TCI (Refer to Engine Mechanical System - " Air Cleaner") G 1.0 T-GDI (Refer to Engine Mechanical System - " Air Cleaner") |
| 3. |
Remove the battery and battery tray. D 1.4 U2 TCI (Refer to Engine Electrical System - "Battery") G 1.0 T-GDI (Refer to Engine Electrical System - "Battery") |
| 4. |
Remove the fuel filter. (Diesel vehicle only) D 1.4 U2 TCI (Refer to Engine Control / Fuel System - "Fuel Filter") |
| 5. |
Remove the ECM. D 1.4 U2 TCI (Refer to Engine Control / Fuel System - Engine Control Module (ECM)") G 1.0 T-GDI (Refer to Engine Control / Fuel System - Engine Control Module (ECM)") |
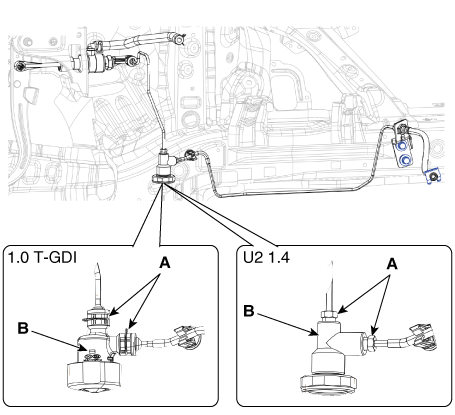
| 6. |
Remove the snap pin and flare nut (A) and then remove the regulator (B).
|
| Installation |
| 1. |
Install in the reverse order of removal. |
| 2. |
After be equipped, perform bleeding air procedure in clutch release cylinder after pouring the brake fluid. (Refer to Cltuch Release Cylinder - "Adjustment") |
 Clutch Master Cylinder
Components and components location
Components
[Gasoline 1.2, 1.4 ]
1. Clutch pedal assembly
2. Ignition lock and clutch switch
3. Master cylinder
4. Clutch ...
 Clutch Tube
Components and components location
Components
[Gasoline 1.2, 1.4]
1. Clutch pedal assembly
2. Ignition lock and clutch switch
3. Master cylinder
4. Clutch t ...
Other information:
Kia Rio 2017-2025 YB Service Manual: Brake Pedal
Components and components location Components 1. Brake member assembly 2. Stop lamp switch 3. Pedal assembly Repair procedures Removal 1. Switch "OFF" ignition and disconnect the negative (-) battery terminal. ...
Kia Rio 2017-2025 YB Service Manual: Power Door Mirror Actuator
Components and components location Components 1. Side repeater lamp Repair procedures Inspection 1. Disconnect the negative (-) battery terminal. 2. Remove the front door quadrant inner cover (A). ...
